User Management
- How to Use User Management
On the User Management Page, registered users are listed. You can search for users or import user information or register new users.
For details on importing user information and adding new users, refer to [Import User Information] and [Operations on User Edit Page].
■User Search
Specify the following search conditions and click the [Search] button.
* You can search by specifying multiple conditions.

Search for all entries by using a keyword such as a login ID/user name/email address/company/division/others.
* Login ID: ID used to log in to the Management System/Public Page
* User name: Registered user name (name of the person who uses the service)
Role
Search by the access authority (Editor / Administrator) to the Management System.
Status
Search by user status (valid / invalid).
■Operation on User List Page
List all users registered so far. Click each user row to check and edit the user information. [Operation on User Edit Page]

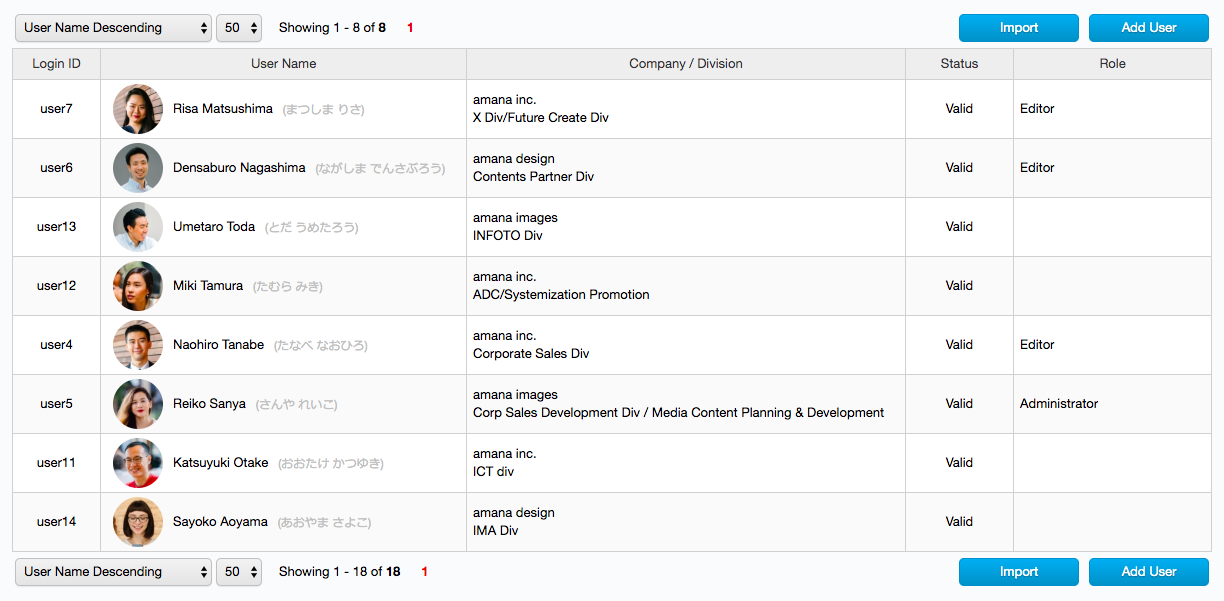
Sort Users / Change the Number of Users Displayed
Select from the [Descending Date] pulldown to sort the users by registration date.
Select from the [50] pulldown to specify the number of items to be displayed on one screen. 10/20/50/100/500
User List
The following items are displayed in the user list display area. [Operation on User Edit Page]
Login ID:Display the ID used to login to the Management System/Publish Page.
User Name:Display the registered user name.
Company/Division:Display the company/division name registered.
Status:Display only the users who “Valid”.
※ The user who “Invalid” on the User Management Page is not counted as a number of the user registered.
Role:Display the access authority (author/editor/administrator) to the Management System.
※ An “author” is granted the authority which can access the Management System to edit its own entry.
※ An “editor” is granted the authority which can access the Management System to edit entry/user management or browse log management.
※ An “administrator” has all the privileges of the Management System.Import User Information
By creating and importing a CSV file of user information, user data can be added/updated/invalidated.
Click the [Import] button to operate from the Import Page. [Import of User Imformation]
Add New User
You can register a new user.
Click the [Add User] button to register a new user on the User Edit Page. [Operation on User Edit Page]
■Download CSV
Click the [CSV Download] button to download the user list in CSV file format.
※ The users of the search result will be downloaded. (If you do not search, all users registered will be downloaded.)
The CSV file has the following format.

- Operation on User Edit Page
On the User Edit Page, you can add/edit the user information. [How to Use User Management]
User information that created/edited can also browse on My Page of the Publish Page.
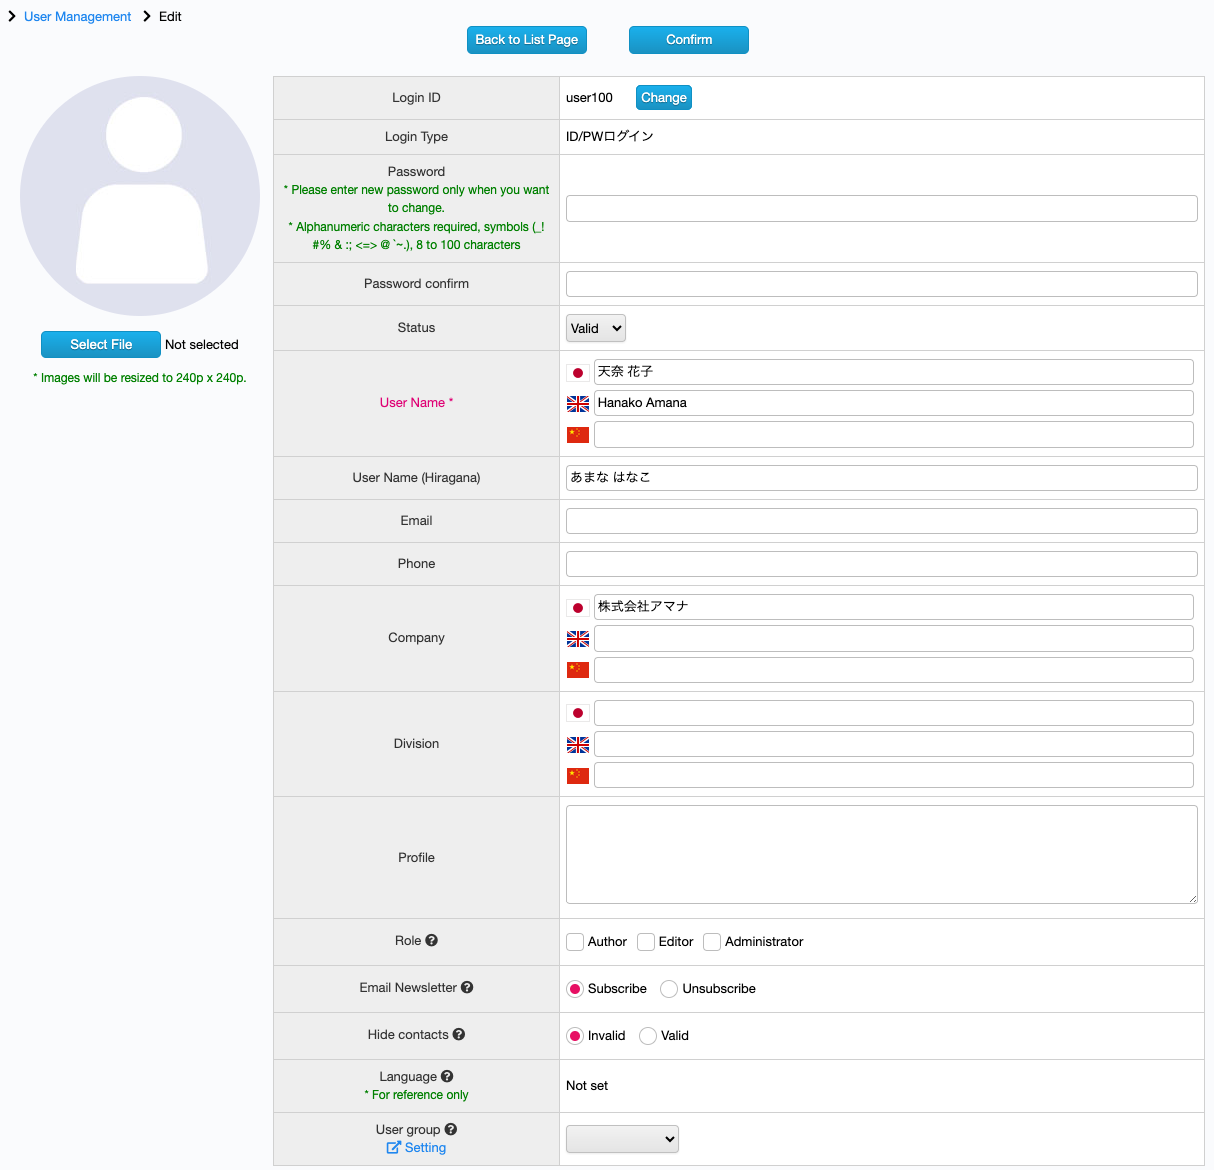
■Creating/Editing User Information
Display the detailed settings for user information in the user information area. Create or edit as appropriate.
※ The change of “User Name“, “Email” and “Role” will be applied when the user logs in next time.

Login ID <Required if add>
Set the ID to log in to the Management System and Publish Page.
Enter 1 to 255 single-byte alphanumeric characters. You can use (-_+. @).
If you want to change the login ID after creating a user, you can do so by pressing the “Change” button on the user editing screen.
※Single sign-on uses the login ID as the key. See Single Sign-On Settings for details.
Password <Required>
Set the password to log in to the Management System and Publish Page.
Set between 8 and 100 characters and be sure to mix single-byte alphanumeric characters. You can use(_!#%&:;<=>@`~).
※ If you want to change the password which has been registered already, please edit it.
Confirm Password <Required if add>
Please confirm your new password by entering it again.
Status
Specify whether to enable/disable the status. If the status is “Invalid”, it will not be counted as a registered number of users.
User Name <Required>
Set the user name for display on the Management System and Publish Page.
User Name (Hiragana)
Set the user name in Hiragana for display on the Management System and Publish Page.
User Name (English)
Set the user name in English for display on the Management System and Publish Page.
Email <Required>
Set the email address used for messages about entries.
Phone
Set the phone number for the basic information of the user.
Company
Set the company name for the basic information of the user.
Division
Set the division name for the basic information of the user.
Profile
Set the profile of the user.
Specify the access authority to Management System.
※ An “author” is granted the authority which can access the management system to edit its own entry.
※ An “editor” is granted the authority which can access the management system to edit entry/user management, or browse log management.
※ An “administrator” has all the privileges of the management system.You can set subscribe/unsubscribe of the email newsletter.
For users with hidden contacts enabled, the information of “email address” and “phone number” will be hidden on the public screen.
The “Site Language” settings is set by the user themselves. If they have never logged in before, the language will be shown as “Not set”. By default, the email newsletter will be sent in Japanese.
User Image
Set the profile picture displayed in My Page or Credit area of Publish Page.
Click the [Select File] button to upload the image.
The image will be trimmed to 240 x 240. Please select a larger image than this.
Confirm/Update User Information
If you edited or inputted contents, be sure to click the [Confirm] button, then navigated to the User Management Confirmation Page.
Please verify contents and if you want to change it, click the [Back to Edit Page] button. If you satisfied, click [Update] button to commit changes.※ If you don’t click the [Confirm] button to update the user information, changes to be discarded.
Back to Edit Page
Click the [Back to Edit Page] button to navigate to the User Management Page.
※ If you return to the User Management Page, the edited content is discarded. To apply changes, be sure to click the [Confirm] button and commit the update on the User Management Confirmation Page.
- Import User Information
On the Import Page, you can import/update/invalidate user data by importing a CSV file of user information.
■Operation on the Import Page
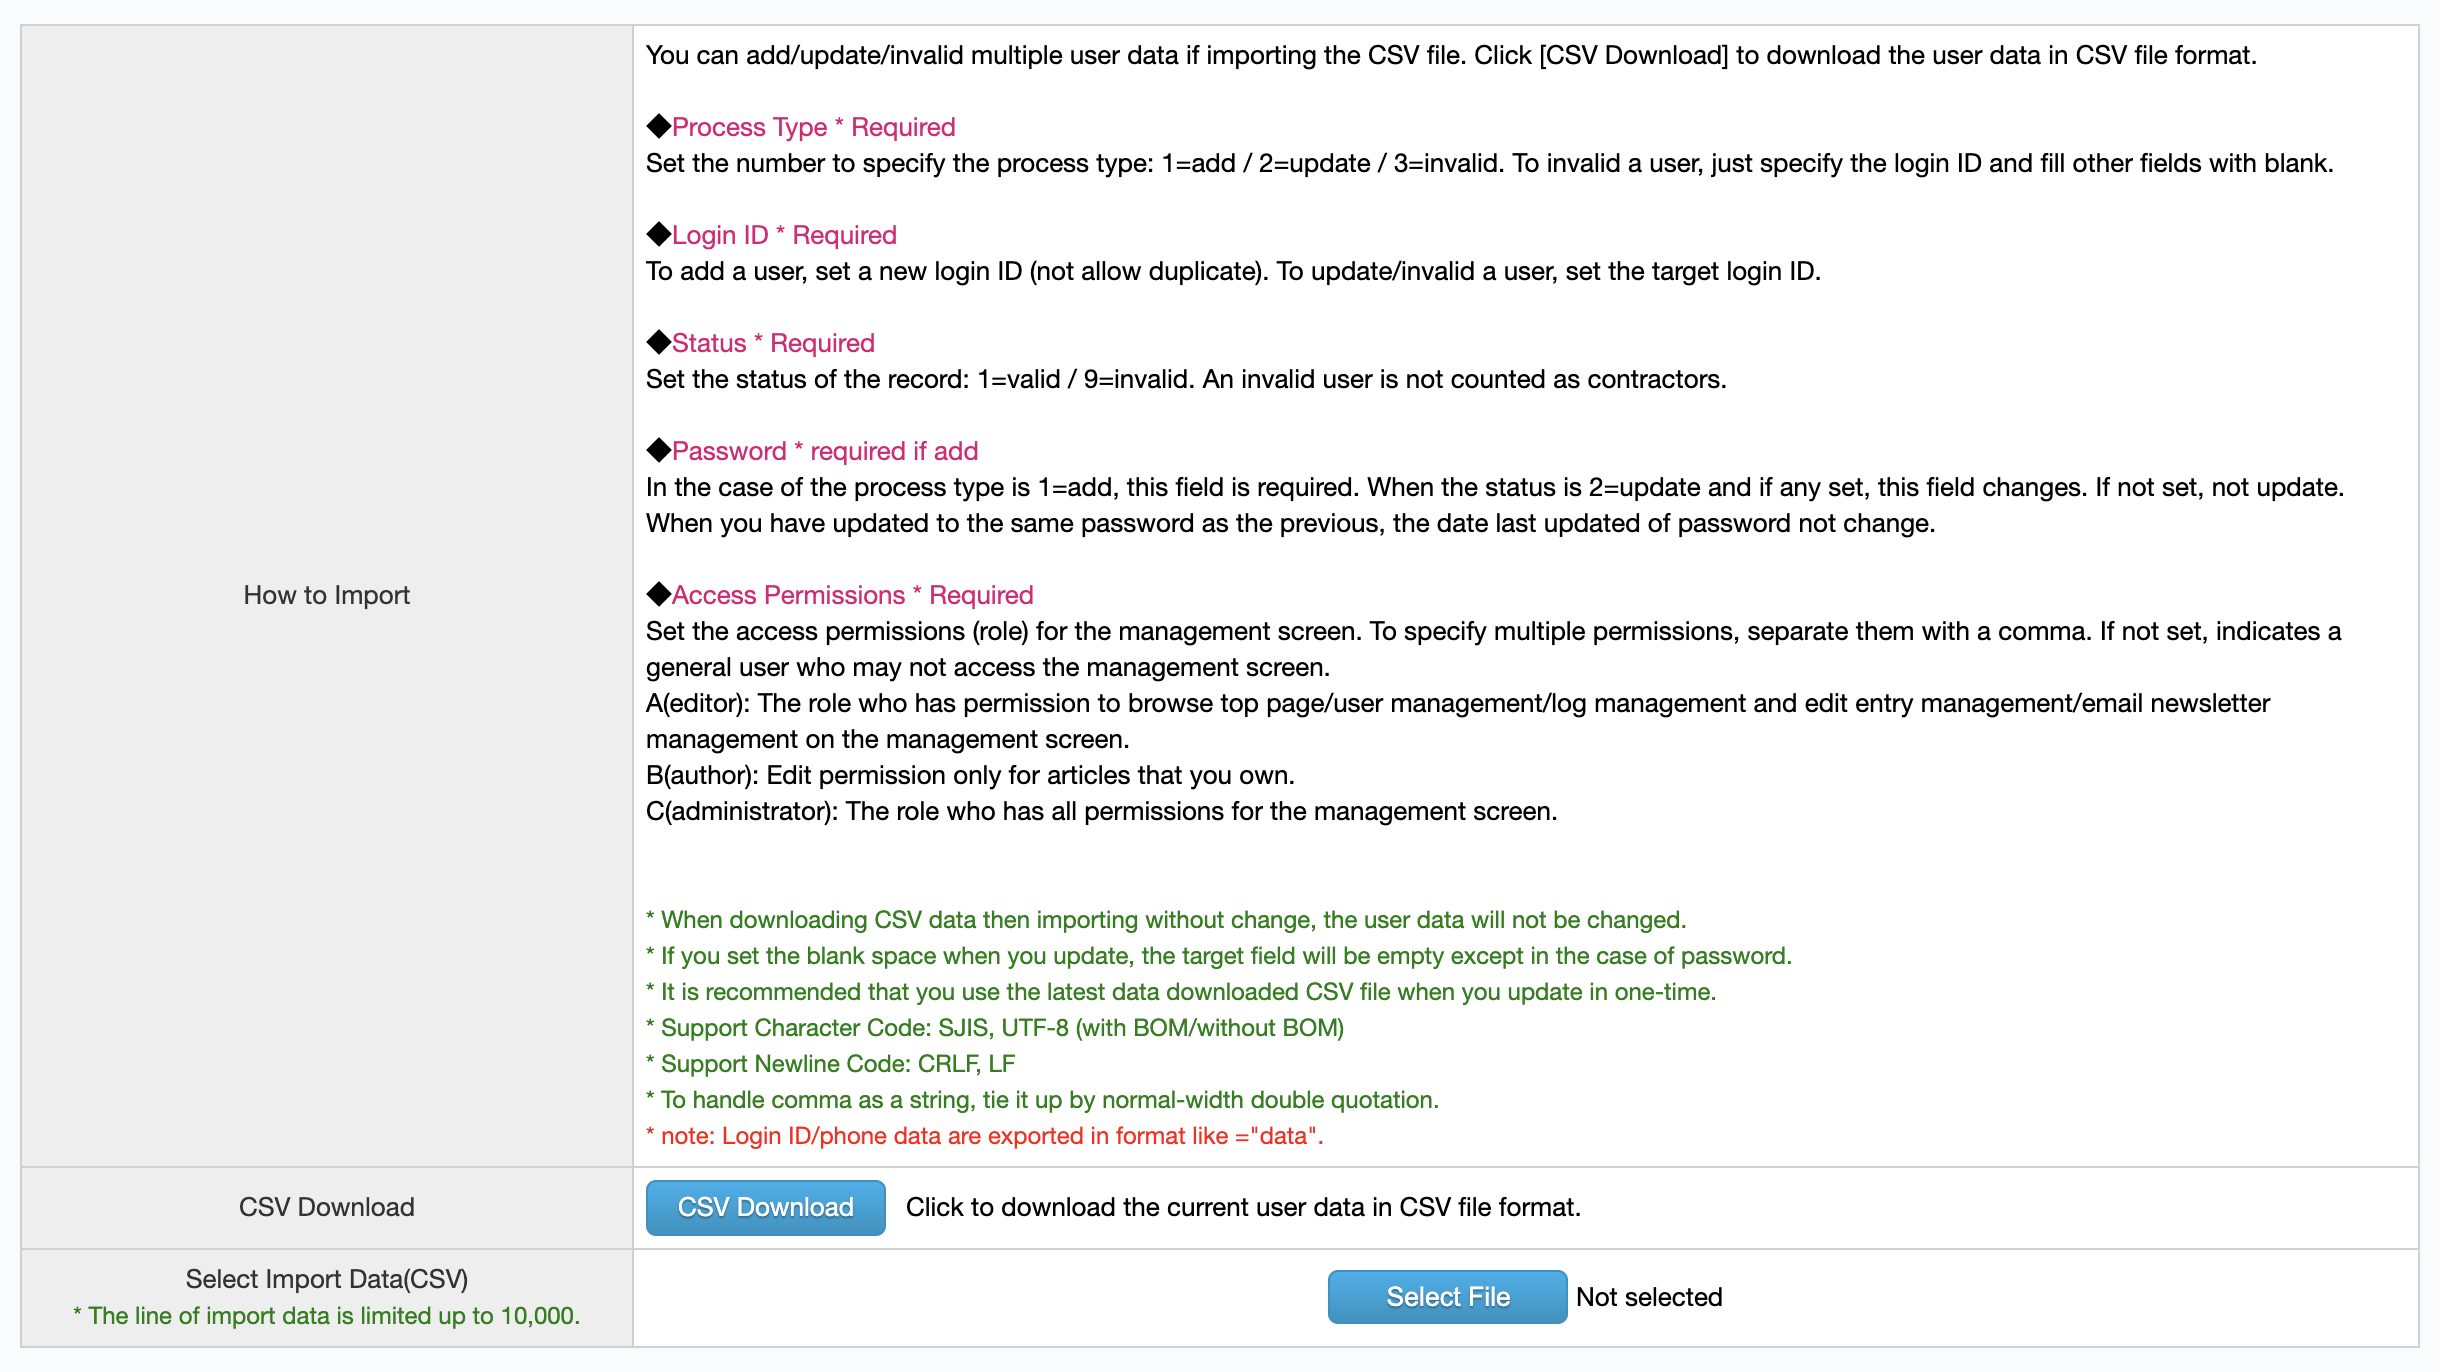
On the Import Page, the instructions of the import and detailed explanation about CSV structure are displayed.

Instructions
On the Import Page, the import procedure and the explanation of the CSV data structure are displayed. Please check the contents.
CSV Download
Download the current user data in CSV file format. You can check the file structure (item) of the user data.
Click the [CSV Download] button to download the CSV file.
Select Import Data (CSV)
Click the [Select File] button and specify the CSV file to import.
※ Imported data is limited to 10,000 lines.
Confirm/Update Import Data
Select the CSV file for import and click the [Confirm] button to navigate to the Import Confirmation Page.
Click the [Start Import] button to update (add / update / invalidate) the user data.
Once the import is completed, navigate to the User Management Page.
If you want to change the contents on the Import Confirmation Page, click the [Back] button and try it again.
※ If you do not update the settings by clicking the [Confirm] button, the data will be discarded.
■Structure of CSV file for import
The CSV file for import consists of the following items.
Click the [CSV Download] button on the Import screen to download the CSV file, and you can check the item contents.
※ If the import data is incomplete, an error message will be displayed. Correct the item according to the message.
Process Type <Required>
Specify the process type for import data.
Set one of the following numbers. (1=add / 2=update / 3=invalidate)
Login ID <Required>
To add a new user, specify a new ID.
If update / invalidate, specify the target login ID.※ To add a new user, enter 1 to 50 single-byte alphanumeric characters. You can use (-_.@). Please be sure not to duplicate to existed login ID.
Status <Required>
Specify whether to enable/disable the status. (1:Valid、9:Invalid)
If the status is “Invalid”, it will not be counted as registered numbers of users.
Password <Required if add>
Set the password to log in to the Management System and Publish Page.
※Set between 8 and 100 characters and be sure to mix single-byte alphanumeric characters. You can use(_!#%&:;<=>@`~).
Access Permissions <Required>
Specify the access permissions for the management system:blank=general user (can’t access) / A=editor / B=author / C=administrator.
User Name <Required>
Set the user name within 100 characters for display on to the Management System and Publish Page.
User Name (Hiragana)
Set the user name in Hiragana within 100 characters for display on to the Management System and Publish Page.
User Name (English)
Set the user name in English within 100 characters for display on to the Management System and Publish Page.
Email <Required>
Set the email address used for messages about articles.
Phone
Set the company name for the basic information of the user.
Company
Set the company name within 500 characters.
Division
Set the division name within 1000 characters.
Profile
Set the profile of the user.
- About Role
■About Role
Access rights to each function are managed by the role settings of each user.
Role setting can be set from the User Management Page only by an administrator user.General (no authority):Somebody who can only view the Published Page.
Author:Somebody who can access the Management System and edit their own entry.
Editor:Somebody who has some part of authority for Entry/Log/User Management (viewing permission only for User Management).
Administrator:Somebody who has all authority on the Management System.Role Type and Assumed Tasks
Author:You can edit your entries, send confirmation request, and put status foword to “Proofreading Completed”. (You cannot publish entries.)
Editor:You are in charge of publishing entries. You can view activity logs, send email news letters.
Administrator:You are in charge of Site settings and User Maintenance.Authority Matrix
- CMS
Function Page Author Editor Admin. Note Management System Dashboard × ○ ○ Entry Management List △ ○ ○ Authors cannot see the entries being edited by other users. Entry Management Confirm ○ ○ ○ Entry Management Edit △ ○ ○ Authors cannot publish entries. Editors are in charge of publishing entries. Entry Management Calendar △ ○ ○ Authors cannot see the entries being edited by other users. User Management List × ○ ○ User Management Detail × ○ ○ User Management Edit × × ○ User Management Import × × ○ User Management Export × × ○ Log Management × ○ ○ Email Newsletter Management × ○ ○ Site Settings General Settings × × ○ Site Settings Information Settings × × ○ Site Settings Credit Settings × × ○ Site Settings Category 1 Settings × × ○ Site Settings Category 2 Settings × × ○ Site Settings Entry Tag Settings × × ○ Site Settings Recommended Keyword Settings × × ○ Site Settings NG Word Settings × × ○ Site Settings Mail Template Settings × × ○ Site Settings Recommended Entry Settings × × ○ Site Settings Entry Type (for API) Settings × × ○